Saturday, November 20, 2021

Pretty Pumpkins So Thankful For you!

Good evening!

I hope you are all having a fantastic Saturday night! It's been a great weekend with some fun stamping! I decided to take a break from some Christmas projects and make a fall card for the Global Design Project Challenge this week! 

This week is a card sketch challenge-this is my take on it!


The Pretty Pumpkins Bundle was perfect for this sketch! And I love the shabby chic vibe, the old folded paper look with elegant copper and white pumpkins. The Copper Foil and Pearlescent Paper give the pumpkins some pretty sparkle and shine. And I love the fussy cut sentiment in the Copper Embossing Powder!

Here is the Global Design Project Sketch if you would like to join in the fun! You have one more day!

Thanks for stopping by!

Monday, November 15, 2021

Stampin' Up! Seasonal Sale!!


Hello! Stampin' Up! is offering a fantastic sale starting tomorrow, Nov. 16, 2021 through Nov. 18, 2021! For three days only you can stock up on cardstock, inkpads and dies from the Annual Catalog at incredible savings!

Here are all of the details!

SEASONAL SALE

Fold, snip, layer, and stamp! During the Seasonal Sale, you can stock up and save 10% on cardstock, 15% on ink pads, and 20% on dies. Build up your collection of crafting basics—and prepare for another year of top-tier projects—with a steal of a deal on papercrafting products!

PROMOTION DETAILS

PROMOTION PERIOD: 16–18 NOVEMBER 2021

  • The sale will run for three days only.
  • The discount includes 10% off cardstock, 15% off ink pads (excluding ink pad 
  • bundles and third-party pads), and 20% off dies.
  • The discount applies to products featured in the 2021–2022 Annual Catalog only. 
  • Products from the July–December 2021 Mini Catalog are not included.

Click on the Shop with Me button at the top of this page 
Nov. 16-18, 2021 to take advantage of awesome savings on 
awesome products!!

Thanks for stopping by!


Thursday, November 11, 2021

Whimsical Trees Winter Christmas Card!

Hello all!

Today I am participating in the Global Design Project Challenge! Challenges (of the crafty kind, lol) are so much fun! For me they are a springboard to creativity! The challenge this week is to create a project using the color combo of Blushing Bride, Misty Moonlight and Mint Macaron. Aren't those colors so soft and pretty together? 

This is what I came up with for the challenge!


As soon as I saw the challenge I knew that the Whimsical Trees Bundle was going to be perfect! The sky is Misty Moonlight blended onto the paper with the fabulous Blending Brushes. The tall trees are cut out of Mint Macaron Cardstock, and after adhering the the card front, I watercolored them with Mint Macaron Ink and a Water Brush. The small trees are cut out of the Shimmery White Cardstock then water colored with Mint Macaron Ink. I used Stampin' Write Markers for the holly leaves and berries, and the sentiment is stamped in Basic Gray and lightly water colored with Blushing Bride Ink.

Here is a close-up!
 

I added a little strip of the Blushing Bride Frayed Grosgrain Ribbon, some iridescent sequins from the Expressions in Ink Ephemera Pack and generous use of Wink of Stella for the finishing touches.

Do you want to join in the challenge? You can join until Sunday, November 14, 2021!
Thanks for stopping by!


Tuesday, November 9, 2021

Frosted Gingerbread Sugar Plum Fairy!

Good Morning!

Today I am participating in the Stampin' Through the Catalog Challenge to make a project with the Frosted Gingerbread Stamp Set. This stamp set is fabulous! And so is the rest of the coordinating suite! If you haven't seen the suite, you can check it out here! 

The fun thing about the Stampin' Through the Catalog Challenges are that you are encouraged to "think outside the box" with the featured stamp set. I wanted to come up with a unique way to use this stamp set and the coordinating Gingerbread Dies. So, as I looked at the two products, I came up with the idea to make angels out of the bell shaped dies. I am so happy with the way that they turned out! You can see them in my last post here (I also explain a bit about how I made them in that post). But, I really didn't use the Frosted Gingerbread Stamp Set on that project, so I came up with something new idea! This is a "Sugar Plum Fairy" sort of card that incorporates lots of the stamps in the set as well as the dies! 

I love this little fairy! Here is a close-up!


I wanted the fairy to be the star of the card, so I decided to do a simple step card so that she would stand out! Here is a side view of the card!


This was such a fun challenge to come up with a new way to use Stampin' Up! amazing products! 

Thanks for stopping by!


Sunday, November 7, 2021

Monday Montage Week #201


It's Monday Montage Blog Hop time!! And I am so excited to share my projects with you today! Although I still have some fall projects that I want to create and share, I just had to skip ahead to a Christmas themed project for this hop-but it's never too early for Christmas projects, right? And the July-August 2021 Mini Catalog has soooooo many amazing Christmas products to choose from! The moment I opened the catalog, the Gingerbread and Peppermint Suite had my heart!! This suite is beyond adorable! There are so many fun elements-from the stamps to the dies and embellishments! Its a Christmas cookie and candy heaven!

So, I ordered it right away, but because I was making Halloween projects, I just barely pulled out the Frosted Gingerbread Bundle this last week to make some projects. As I was gazing at it adoringly, I realized that I could make angels with the bell dies!! And this project was born!


Seriously!! These angels came out even better in real life than in the vision in my head! The Pearlescent Paper has just the right amount of shimmer for the angel dresses and the Gold Foil Sheets really added elegance and shine! Here are some close-ups! 


First, here is the card. The background is Pearlescent Paper Embossed with the Merry Melody 3D Embossing Folder-trust me, you can't really see it in the photo, but the result is stunning!! I put a matte under it with the Gold Foil Sheets. Tip: Use the Paper Trimmer to trim out the middle section of the Gold Foil rectangle to use for something else to save that beautiful paper. In this case I used it to cut out the large star and the tiny stars. My Card Base is Very Vanilla Thick Cardstock. The sentiment is from the For Unto Us Stamp Set (this stamp set is a gem of Christ themed sentiments and I 💓 it) and embossed with gold embossing powder.

Here is a close-up of my little angel! 


The angles are all done with dies from the Gingerbread Dies! The largest circle is the head and then one more in the hair color of your choice cut in half for the bangs, the little bun is the smallest circle stamped with the swirl stamp in the Frosted Gingerbread Stamp Set. The wings are Vellum Cardstock cut with the Ornament Die and the little halo was a left over gold piece from the bottom of the bell die, which I trimmed to fit the angel's head. This was so much fun! And once the ball was rolling, I decided to make angel ornaments as well! 


The process was the same, I simply added a gold loop with the Simply Elegant Trim. I cut a second circle in the matching hair color to glue to the back of the angels to hide where the trim is glued on. I also cut a solid bell shape out of Very Vanilla Cardstock to glue to the back of each angel to cover the glued on wings and make it all look very neat and tidy!

Thanks for stopping by! I hope you enjoyed these little angels and that my quick instructions all make sense! You don't want to miss out on any of the projects my friends have for you! You can click the next button to see Wendy's amazing work, or click the back button to check out Elizabeth's fabulous project. Either way you hop, I hope you find something that inspires you to celebrate! See you next time!

Click here for Wendy Weixler


Click here for Elizabeth Price


You can use the forward and back buttons, or follow our hop using the links below!

Monday Montage Hoppers

Monday, November 1, 2021

Little Delights Fall Thank You Card!

Hello and Happy Monday!

Today I am participating in the Stampin' Through the Catalog Challenge to make a project with the Little Delights Stamp Set. This set is so fun! And one of the reasons is because it combines four different occasions into one stamp set: Halloween, Fall, Christmas and birthday. I love sets like these because they are so versatile!! And not only does this set have cute images, it also has sentiments! Win, win! 

I wanted to make a fall thank you card for some dear neighbors, so I decided to make my own Designer Series Paper for the background with two of the images in the set. 

This is what I came up with!


Soft Sea Foam and Cinnamon Cider were perfect color choices for a soft fall look. I did stamp of the Cinnamon Cider each time because the full strength ink was a little too dark for what I was going for. The sentiment is embossed with Copper Embossing Powder from the Metallics Embossing Powders and the Baker's Twine is colored with the Dark Mint Macaron Stampin' Blends for perfect color coordination! I added a few leaves from the Forever Flourishing Dies and some Genial Gems to finish it off!

Thanks for stopping by!

Tuesday, October 26, 2021

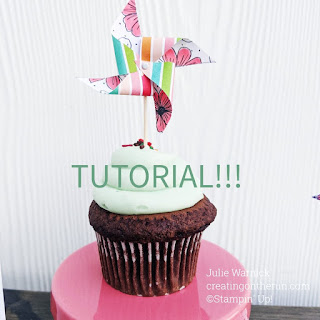
Tiny Pinwheel Tutorial!

Good morning!

If you didn't catch my last post, go check it out! It was the Monday Montage Blog Hop's 200th hop!! And we are celebrating! One of my projects is a tiny little pinwheel cupcake topper. Today I'm going to do a quick tutorial so you can make your own! 

These darling little pinwheels are so easy, but can add so much to your party decor!


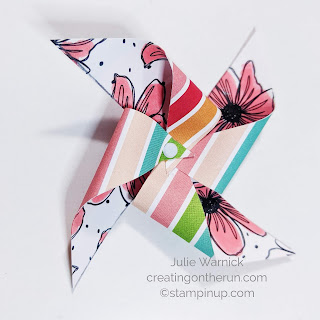
Aren't these adorable! And they are so quick and fun to make! 

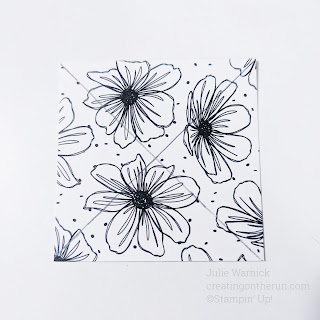
1. Pick a Designer Series Paper that matches your party theme and cut as many 2 inch squares as you need. Each 2 inch square will make one pinwheel. I used paper from the Pattern Party Designer Series Paper. This paper is free with Stampin' Rewards! 

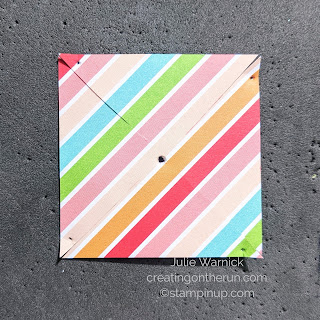
2. Using a pencil and ruler, draw two diagonal lines from corner to corner as shown.


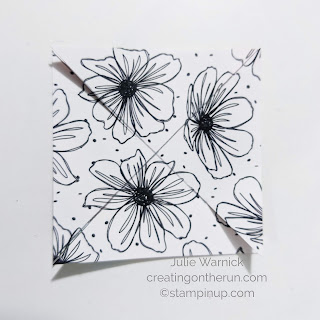
3. Using Paper Snips, cut from the corner on each diagonal line towards the center. Stop cutting a little more than 1/4 inch from the center point of the paper as shown. 

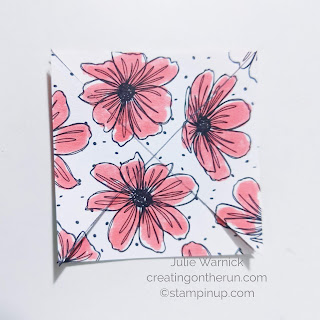
3. At this point I colored in the flowers on the black and white side of the DSP to match the stripes on the front (optional).


4. Using the Stampin' Pierce Mat and the Take Your Pick Tool, poke holes in the center and the  right corner of each triangle as shown.


5. Using one of the small, round brads from the Round and Square Brads, carefully place the brad through one of the corner holes. Fold the paper gently, being careful not to crease it and repeat with each hole as shown. Insert the brad through the middle hole and fasten the brad to hold the pinwheel in place. 

Using Mini Glue Dots or hot glue, adhere a toothpick to the back of the pinwheel and insert in a cupcake!

I hope you enjoy making pinwheels! You can adapt these instructions to make pinwheels in any size! 

Thank you for stopping by!

Monday Montage Week #267

       Hello all! Happy Monday! And welcome to our blog hop! Today I have a thank you card for our dentist. We went to Yellowstone last week...