Tuesday, October 26, 2021

Tiny Pinwheel Tutorial!

Good morning!

If you didn't catch my last post, go check it out! It was the Monday Montage Blog Hop's 200th hop!! And we are celebrating! One of my projects is a tiny little pinwheel cupcake topper. Today I'm going to do a quick tutorial so you can make your own! 

These darling little pinwheels are so easy, but can add so much to your party decor!


Aren't these adorable! And they are so quick and fun to make! 

1. Pick a Designer Series Paper that matches your party theme and cut as many 2 inch squares as you need. Each 2 inch square will make one pinwheel. I used paper from the Pattern Party Designer Series Paper. This paper is free with Stampin' Rewards! 

2. Using a pencil and ruler, draw two diagonal lines from corner to corner as shown.


3. Using Paper Snips, cut from the corner on each diagonal line towards the center. Stop cutting a little more than 1/4 inch from the center point of the paper as shown. 

3. At this point I colored in the flowers on the black and white side of the DSP to match the stripes on the front (optional).


4. Using the Stampin' Pierce Mat and the Take Your Pick Tool, poke holes in the center and the  right corner of each triangle as shown.


5. Using one of the small, round brads from the Round and Square Brads, carefully place the brad through one of the corner holes. Fold the paper gently, being careful not to crease it and repeat with each hole as shown. Insert the brad through the middle hole and fasten the brad to hold the pinwheel in place. 

Using Mini Glue Dots or hot glue, adhere a toothpick to the back of the pinwheel and insert in a cupcake!

I hope you enjoy making pinwheels! You can adapt these instructions to make pinwheels in any size! 

Thank you for stopping by!

Sunday, October 24, 2021

Monday Montage Week #200


Hello! I am so very glad you are here for our 200th Monday Montage Blog Hop!!! I am so grateful for the opportunity to know these wonderful ladies that I hop with. Not only are they talented stampers and crafters, they are the best, most kind and wonderful people! I've said it before, and I'll say it again-it's and honor and a privilege to hop with these ladies! And thank you to all of you that have hopped along with us! 

We are commemorating this momentous occasion with a celebration theme for all of our projects! So, I hope you enjoy this fun-filled hop! 

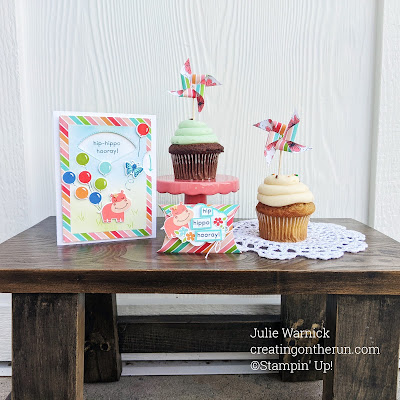
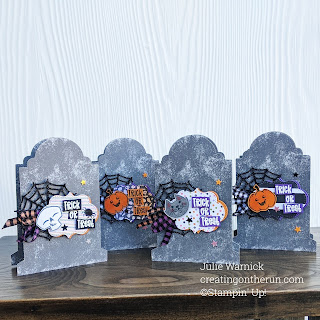
As soon as we decided on this theme, I thought of The Hippo Happiness Stamp Set and the Hippo & Friends Dies. These coordinating products are filled with fun images and a wide variety of dies that are perfect for celebrating! And they are great for multiple types of celebrations! This is what I came up with!


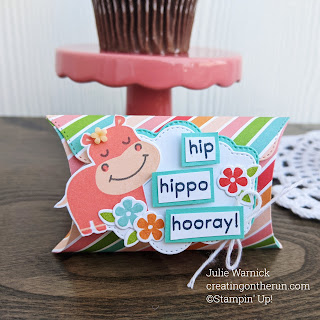
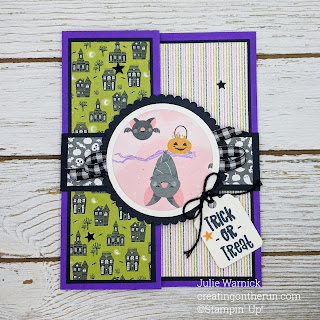
These projects were so fun to make! I also used the Give it a Whirl Dies to make the card interactive and I am so happy with the results! The Give it a Whirl Dies are awesome!!! There is a bit of a learning curve, but my fellow hopper Melissa Stout has an awesome video tutorial that helped me out so much! Thanks Melissa! Here is a close-up of the card!


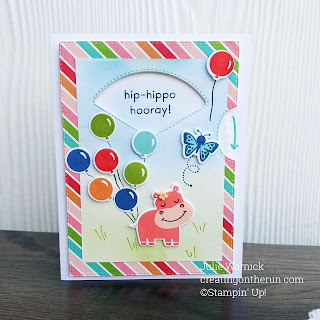
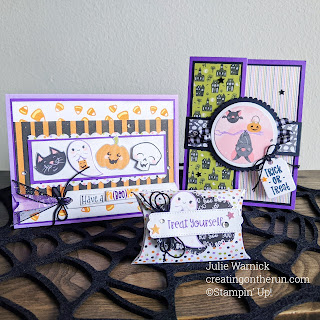
The darling little images in the Hippo Happiness Stamp Set have my heart! I pulled all of the colors for the images from the diagonal striped paper in the Pattern Party Designer Series Paper (DSP) to make this card. The colors are so cheerful and happy! And by the way, I love that paper pack! It has so much variety and it is a big pack! There are four sheets of each double sided design-so cool! It can be earned by redeeming Stampin' Rewards so you can get it free with a qualifying order!  Here is a close-up of the adorable pillow box:


This tiny, oh so cute little treat holder is made with the Pretty Pillow Box Dies. Have you seen the Pretty Pillow Box Dies? They are in the July-December 2021 Mini Catalog and you don't want to miss out on these amazing dies! Just look at the cuteness!!! 

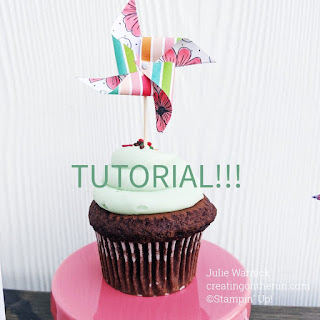
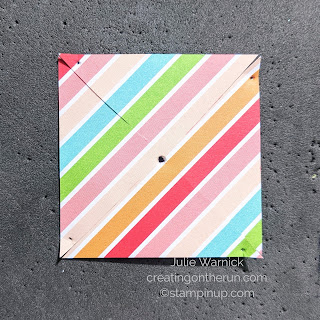
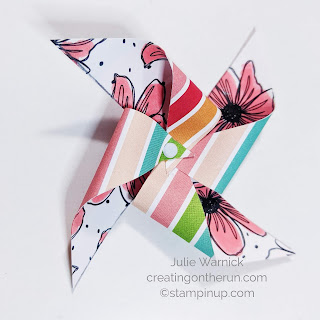
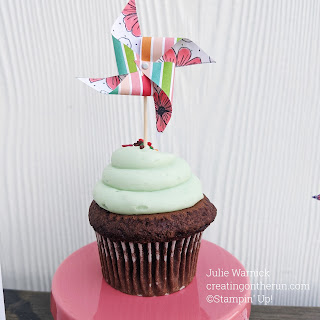
And finally, the tiny pinwheel cupcake toppers!!! I love all things tiny, and these little pinwheels are no exception! They are made with nothing more then a bit of paper, a brad and a toothpick, but they add so much to a cupcake! And they are quick and easy to make-one DIY cupcake topper that is do-able for any party! Check back Tuesday for a quick tutorial for these cutie-patooties!


Thanks for stopping by! I hope you enjoyed these fun celebration projects! And that you continue to hop through our 200th hop!! You don't want to miss out on any of the projects my friends have for you! You can click the next button to see Melissa's amazing work, or click the back button to check out Elizabeth's fabulous project. Either way you hop, I hope you find something that inspires you to celebrate! See you next time!

Click here for Melissa Stout


Click here for Elizabeth Price


You can use the forward and back buttons, or follow our hop using the links below!

Saturday, October 23, 2021

Dia de los Muertos Card!

¡Hola Amigos!

El Dia de Los Muertos or Day of the Dead is November 1st! Yesterday I was cleaning up my messy desk and came across my leftovers from all of my Halloween projects that I've been making.  I had two skeleton faces,  pieces of the Cute Halloween Designer Series Paper and a medallion that I cut out weeks ago and haven't used. Inspiration hit and I realized I had the makings of a Dia de los Muertos card! This is what I came up with!


What do you think? I kind of love it! And most of this card was created from scraps and leftovers! The only things I added to my leftovers are the flowers (from the Hippo Happiness Stamp Set), the Metallic Mesh Ribbon and the card base! I also used clear embossing powder to emboss some little bats, and I used Gorgeous Grape and Pumpkin Pie Stampin' Write Markers to color in the sentiment, both from the Little Delights Stamp Set. It's so fun to make a card from things that might of ended up in the trash! Do you save scraps? If so, what can you make with scraps that you've got lying around on your craft table? I'd love to see! 

Thanks for stopping by!


Tuesday, October 19, 2021

24-Hour Stamp Sale!

 image.png

Good morning!

Is the weather crazy where you are? I am sitting here typing this post while rain is pouring outside! I hope this news brightens up this gray day! Stampin' Up! is having a 24-hour sale on select cling stamp sets! Here are the details!

SALES PERIOD: 20 OCTOBER 2021

  • The sale will run for 24 hours.
  • The 15% discount will apply to select cling stamp sets only.
  • Every cling stamp set from the 2021–2022 Annual Catalog (excluding the Host stamp sets) will be discounted!
This is a great time to get those cling stamp sets you have been eyeing in the Annual Catalog! Which ones are the cling stamp sets? All of the red rubber stamps! Here is a linki to all of the discounted stamp sets! If you can't click on the link, copy and paste it in your browser.
https://su-media.s3.amazonaws.com/media/Promotions/2021/10_24hr-Stamp-Sale/flyer/10.20.21_FLYER_24HR_STAMPSALE_NA.pdf

If you would like to take advantage of this amazing sale, you can also order directly from my online store! Here is the link:


And here is a link to the Clearance Section. Check out the items that have been added! 

Happy Shopping!

Monday, October 18, 2021

Cutest Halloween!

Hello everyone! 

Did you know there are less than two weeks until Halloween?! It is fast approaching so I have been at it again making Halloween projects! And I wanted to join with Stamping Through the Catalog as they feature the Cutest Halloween Stamp Set! I have been having so much fun with this set-anyone who follows me here or on Instagram knows that I have created quite a few projects with it! And I am still loving it! 

In fact, my first project is a Halloween card with a challenge that I came up with myself! I challenged myself to use ALL of the stamps in the set on one card! This is something I have never done before, and it was really fun to find ways to use every. single. stamp. Have a look! 


This was definitely a challenge, but so do-able! Can you find all of the stamps in this card? It's kind of like an I-Spy thing! Here are some hints:  I used several of the sentiments, the candy corn and dot stamps for my background, and there is also one sentiment inside the card. The dot stamp was also perfect for cheeks on the little characters!  Also, don't you think the cute cat face needs a body sometimes? I used the pumpkin punch shape for the body and the ghost punch shape for the tale!

After the card was finished, I made some quick and easy little treat boxes for some neighbors!


These little boxes came together in no time at all! I hope you enjoyed these festive projects today! Thanks for stopping by!

Sunday, October 10, 2021

Monday Montage Week #199


Hi all! Welcome to our Monday Montage Hop today! We are almost to 200 blog hops! I can't believe it! It is an honor and a privilege to hop with these amazing ladies! 

Today I am sharing another Halloween trifecta of fun!!! I have three projects for you, all created with the Cute Halloween Suite featuring the Cutest Halloween Bundle-and it is just the cutest!!! I am in love with the darling pumpkins, ghosts, skulls and bats in this darling suite! The Black and White Gingham ribbon is the best! And the Cute Halloween 6x6 Designer Series Paper (DSP) is SO great!


See what I mean?!! So cute, right? I could make projects all day long with this suite-wait, I did!! Lol, ok, not all day. These projects were really quick to make because the images on the DSP are sized perfectly for the Halloween Punch that is part of the Suite! Just punch and go! There isn't a skull on the punch, but Mr. Skeleton takes no time at all to cut out! Here are some close-ups of the cards!


Look at these cute little faces-all of them were punched/cut straight from the DSP! Easy Peasy!


This card is a simple fun fold card that is my go-to for showcasing amazing DSP! Sometimes I just want to include all of the prints on a card-and this super easy layout allows me to show multiple prints! The focal point of the card is a belly band that slides off of the card to open it. Here is what the card looks like on the inside!


I just had to add Mr. Skeleton one more time! And that white strip of cardstock is for a message to the recipient, of course.

Thanks for stopping by! I'm sure you don't want to miss out on any of the projects my friends have for you so keep on hopping! You can click the next button to see Wendy's amazing work, or click the back button to check out Elizabeth's fabulous project. Either way you hop, I hope you find something that inspires you! See you next time!

Click here for Wendy Weixler


Click here for Elizabeth Price


You can use the forward and back buttons, or follow our hop using the links below!

Monday Montage Hoppers

  1. Amy O'Neill-not hopping this week
  2. Breelin Renwick
  3. Cathy Casey 
  4. Charlet Mallett-not hopping this week
  5. Cheryl Curtis
  6. Dani Dziama-not hopping this week
  7. Elizabeth Price
  8. Julie Warnick-You Are Here!
  9. Melissa Stout-not hopping this week
  10. Wendy Weixler

Saturday, October 9, 2021

Halloween Birthday Card!

Hello and happy Saturday!! Today I decided to participate in the Global Design Project weekly challenge! My daughter has a birthday in October and she loves Halloween and all things spooky, so I thought I'd make her birthday card for this challenge! 


For this card I'm going for the something old, something new theme. The witch hat, leaves and pumpkins are from the September 2020 Paper Pumpkin (something old) and the trees, moon and stars are from the Frightfully Cute Bundle (something new in the July-August Mini Catalog). Isn't it so fun to mix old and new sometimes? The cloud is from the Give It a Whirl Die Set, I just trimmed off the stitches, and the sentiment is from the Sweet as a Peach Stamp Set. Stampin' Blends were perfect for coloring my stamped images!

Here is the original project from the Global Design Project Challenge.


The challenge is to case the designer. I flipped the layout to landscape and then added my design elements to opposite corners like in the original project.  And while my card looks nothing like the cased project, it started the wheels turning for a cool layout and I am really happy with the result! It was a fun challenge!

Thanks for stopping by!

Monday Montage Week #258

    Welcome to our super fun Monday Montage Blog Hop!! We're so happy to have you follow us today!  I'm sharing A fun birthday card ...